
Dave SEKE's out some answers
Published : 06/06/2016 12:45:28
Categories : General
One of the most powerful yet underutilized techniques TurboCAD users of all levels can benefit from is the use of SEKEs. These are single entry keyboard equivalents or hotkeys for quickly performing a function or snapping.
In the case of snapping, SEKEs are preferred drawing method for many power users. The main advantage of using snaps of course is they ensure drawing accuracy automatically. So let’s take a few moments to learn how SEKEs work.
To start it is important to understand what your snap settings are. To do so right click on either the SNAP or GEO buttons at the bottom of the TC screen to bring up the Drawing Aids dialog. Be careful though because left clicking those buttons will turn SNAP and/or GEO aids off completely.
By default the Drawing Aids are set to the following.
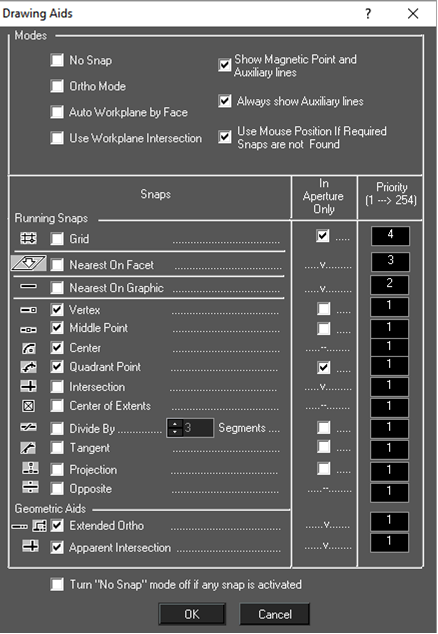
Secondly, you must realize how the “In Aperture Only” setting impacts the use of snaps and SEKEs. The aperture is a defined pixel radius which is set by the Aperture size setting in the Options |Preferences dialog. There is also an option here for displaying the aperture itself which you may find useful for learning. This setting impacts SEKEs because when on, the associated snap will function only when the snap point is within the snap aperture.
A good example of this is to turn on the In Aperture Only for the Middle Point snap. Now let’s draw a horizontal line. Choose the line tool. Use the Tab key until the cursor Is in the “X” coordinate field located in the lower right corner of the screen. Type 0, then Tab to move the cursor to Y field and type 0, then press enter to plot the start point at exactly X=0, Y=0.
Next move your mouse left or right while holding down the Shift Key. This will enable the Ortho Mode drawing aid, which locks the line to be drawn horizontally or vertically only. Now left click your mouse anywhere to set the end point for your horizontal line.
Making sure to the line tool is still active, touch the horizontal line with your cursor and move it back and forth along the line without clicking. Remember the Middle Point snap aperture is on, so as you move your mouse along the line the cursor, the snap indicator (magenta diamond) will highlight either the start point or end point of the line depending on which point you are closest to. This is because for your Vertex snap the In Aperture only is off, meaning the vertex range of the snap point is not constrained to the aperture.
Also notice your cursor will display the vertex snap icon matching the icon in the Drawing Aids dialog.

The one exception will be when you are within the middle point snap’s aperture, in which case your cursor changes to display the middle point snap icon accompanied by snap indicator located in the exact middle of the line segment.

Now move the cursor along the line until one of the end point’s snap indicator is visible. Press M (Middle Point SEKE) on your keyboard. You will get the following TurboCAD warning - The requested operation cannot be completed. A Snap mode is active with no snap points within the snap aperture. Re-try the operation with snap disabled
Now pull up your Drawing Aids dialog and turn off In Aperture only for the Middle Point snap. This time with your cursor any place on the line and press M, your second line’s start point snaps to exactly middle of the horizontal line. Then simply move your cursor to plot the second line’s end point and click to complete the segment. Alternatively, you can Tab into the length field lower left and enter a length, Press Tab again to enter an angle, and press Enter to complete the line.
Now that you understand the basics, take some time to learn the other SEKEs. Here is the complete list of SEKEs, practice by try each one on a variety of object types.
The following is the list of SEKE snaps:
C - Center (snaps to the center of an arc, circle, or ellipse)
D - Single snap to the divide point of a line or arc
E - Single snap to the center of a 3D object
G - Grid (snaps to the nearest grid point).
H - Perpendicular Opposite (snaps to an endpoint so that the new line is bisected by an existing line)
I - Intersection (snaps to the intersection of two objects)
J - Perpendicular (snaps to the perpendicular projection to an object)
M - Midpoint
N - Nearest on Graphic (snaps to the nearest place touched by the cursor)
O - Relocate last point by next click
Q - Quadrant Point (snaps to 0, 90, 180, 270 degree point of a circle, arc, ellipse)
S - No Snap/Cursor location
U - Single snap to the last point
V - Vertex (snaps to endpoints of lines and arcs)
Unassigned - Tangent
Unassigned - Nearest on Facet
You also can more great information about using TurboCAD on the TurboCAD Community site